
In this post, we will go through the different pages in the approval workflow module of Microsoft Dynamics 365 Business Central. With an example of a sales invoice workflow, we will learn how to set up, send and accept an approval request.
- What Is An Approval Workflow?
- Approval User Setup
- Approval Workflow Example
- Requests To Approve
- Approval Entries
- Approval Request Entries
- Send Overdue Approval Notifications
- Posted Approval Entries
Check the post about workflows to have a better understanding about them before digging into approval workflows.
What Is An Approval Workflow?
An approval workflow is the way we can automate approval processes within Business Central. Starting from approval users we can decide who needs to approve a document in order to continue the process that we have established. We can also create notifications and send overdue requests to remind approvers that an action is needed from them.
Approval User Setup
The first thing we need to do in order to set up an approval workflow is to fill in the ‘Approval User Setup’ page. This is the most important page in the approvals module of Business Central. All approval workflows will rely on it.
Here we have to set up all the people involved in any approval workflow. There are different fields for different purposes. Get more information about each one of them here:
Set Up Approval Users – Business Central | Microsoft Docs
Note that the table is the same as on the user setup page (Table 91 User Setup). So they share some fields such as the e-mail, phone no. or Salesperson/Purch.
For this simple test, we will use the following configuration.

Approval Workflow Example
Let´s follow a simple example to explain how an approval workflow works. We will use the Sales Invoice Approval template.
Sales Approval Workflow
The workflow is the following:
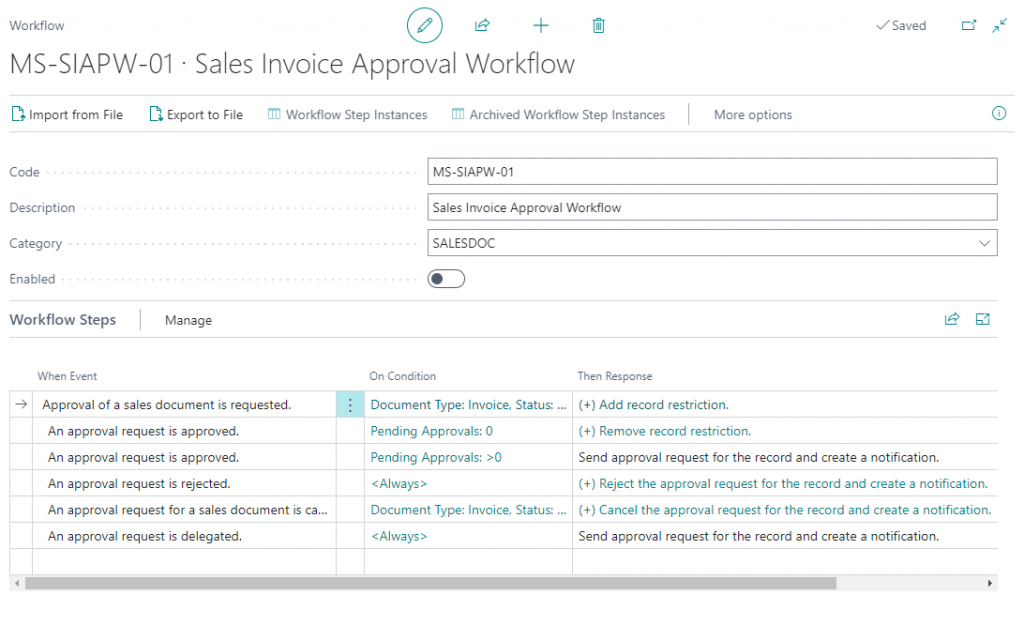
As we can see, there is one main event which is the one that creates the request and initiates the workflow. For the rest of the events to trigger the first one has to be triggered first. In other words, none of the events indented below the first one will trigger if the first one isn´t initiated. This is the purpose of indenting events.

On top of the ‘parent’ event, the conditions of the events must also be met. In this section, we can play with the conditions to conform to our workflow.

A workflow response can have multiple steps itself. Each one of the responses can be customized.

The first response in this workflow is ‘Add record restriction’. It shows this caption because it is the first step in the response. As you can see there are three more:
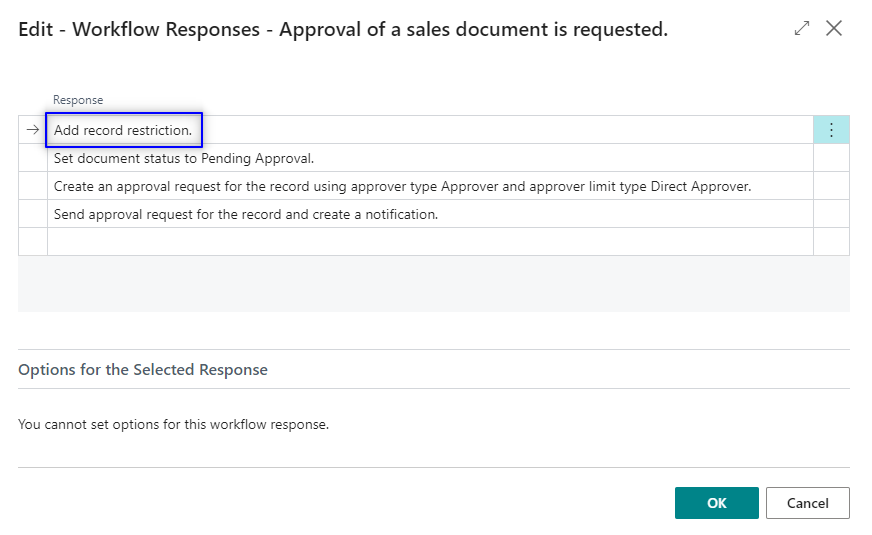
‘Add record restriction’ means that, in this case, the sales invoice can´t be posted until the restriction is removed. Learn more about restricted records here:
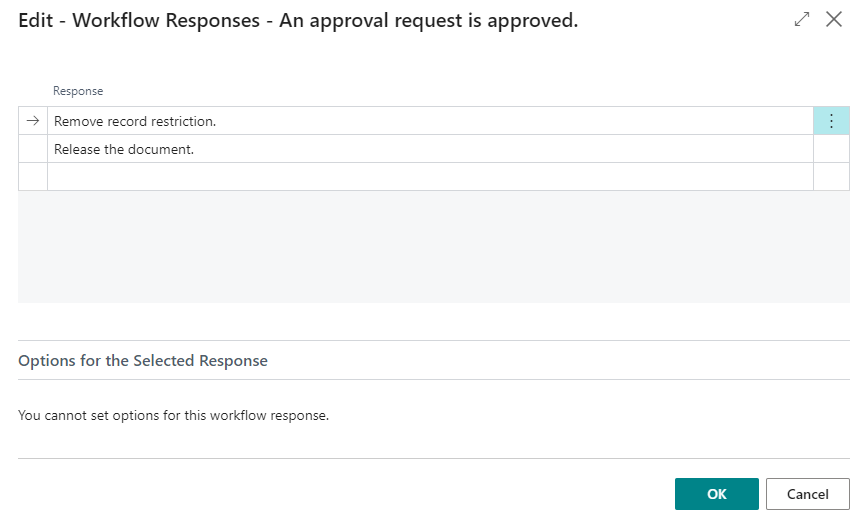
If the approval request is approved we can see that the first step is to remove the record restriction and then release the document.
Trigger The Workflow
We can create now a sales invoice to test the approval workflow. First, you can show the approval factbox to see the status of the approval.
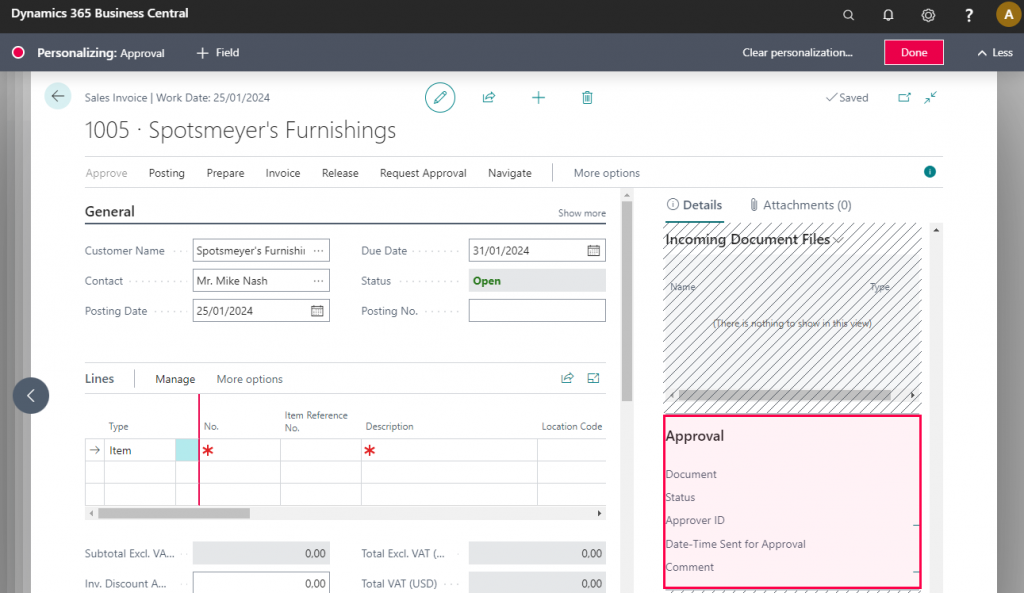
Once we have the invoice ready we can send the approval request.

The status on the document changes to ‘Pending Approval’ and we can see the information of the approval on the factbox we just populated.
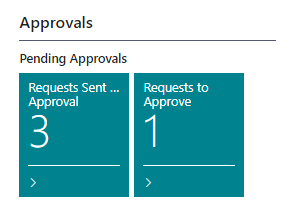
Requests to Approve
You can find pending approvals from the cues of the role center or just by searching ‘Requests to Approve’. Is on this page where the approver will have to accept or reject the requests that have been received.
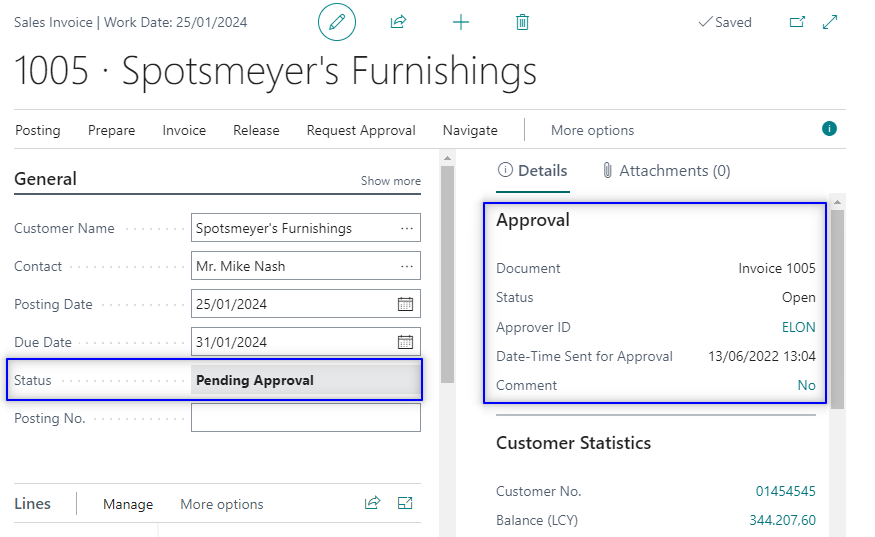
The following page will open with information about the approval, sender, due date, amount, and currency code. You can also see if there is any comment related to the approval.

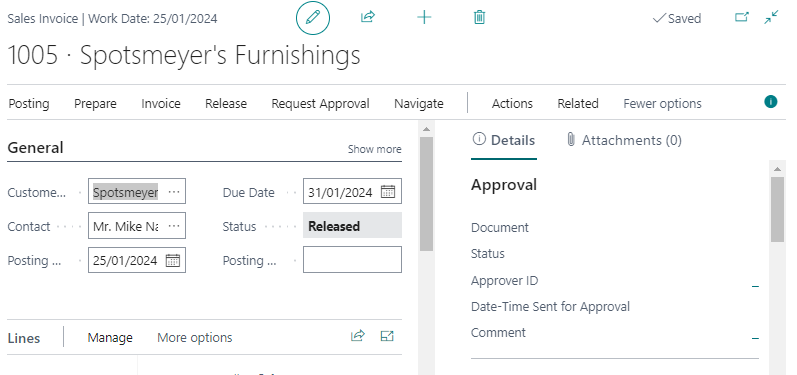
At this point, we can go to the document with the ‘Open Record’ action to verify the information about the approval. We can approve, reject or delegate it. If we approve, the status of the document turns to ‘Released’.
But if we reject it, the status will turn to open meaning that this document has been rejected and can´t be posted. We can also delegate and the status will remain in ‘Pending Approval’ until somebody accepts or rejects.
Let´s approve the invoice in the example. This is now the status.
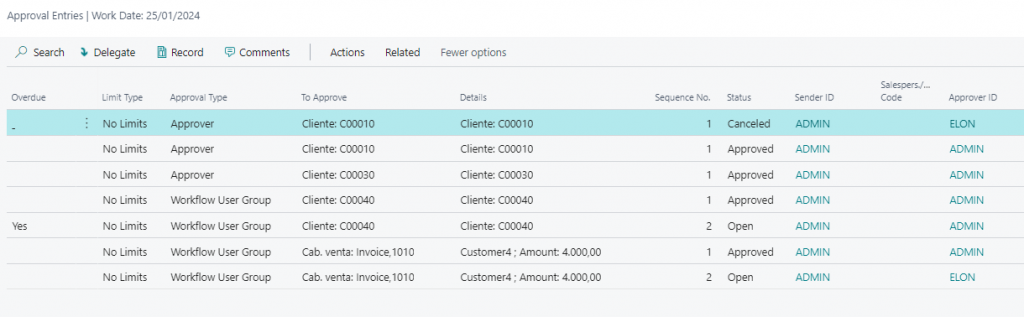
Approval Entries
This page will show all the entries of the approval module that are on the fly. Each user can only see their approval entries. The only one that has access to all the entries is the approval administrator which is defined in the ‘Approval User Setup’.
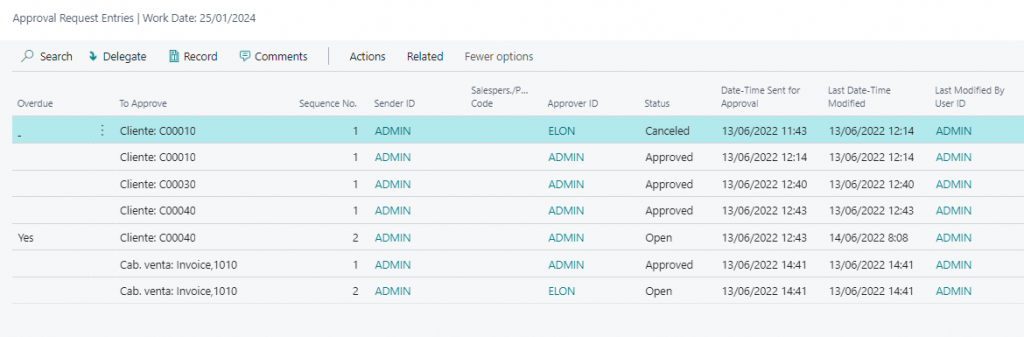
Approval Request Entries
It basically displays the same information as the ‘Approval Entries’ page. It is also filtered for each user so they can only see their approvals.
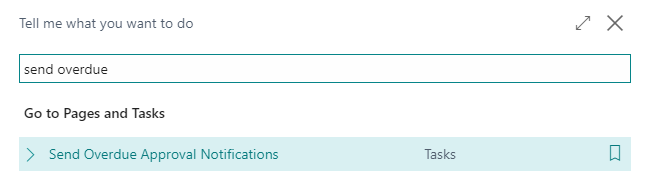
Send Overdue Approval Notifications
When an approval doesn´t receive a response from the approver we can send overdue approval notifications with the following option:
If we try to select it a message will pop up:

This means that we need to set up a specific workflow to send overdue approvals. You can already find a template for this task:

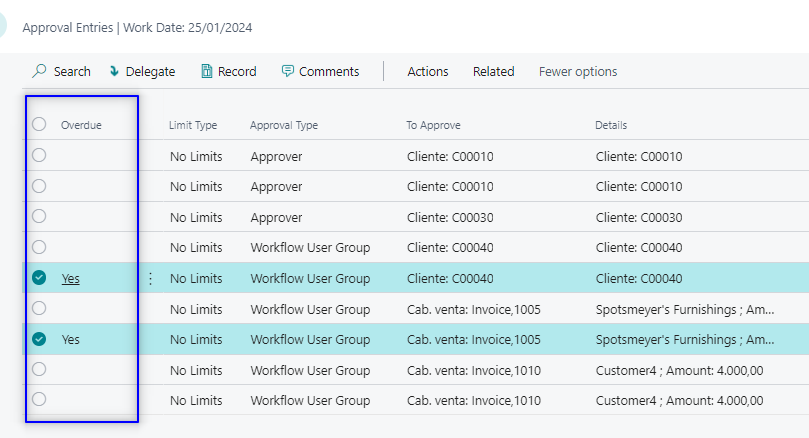
Once we enable it, we can see on our approval entries which ones are overdue.
If we now try to run the task again this message will appear notifying that overdue approval entries have been created:
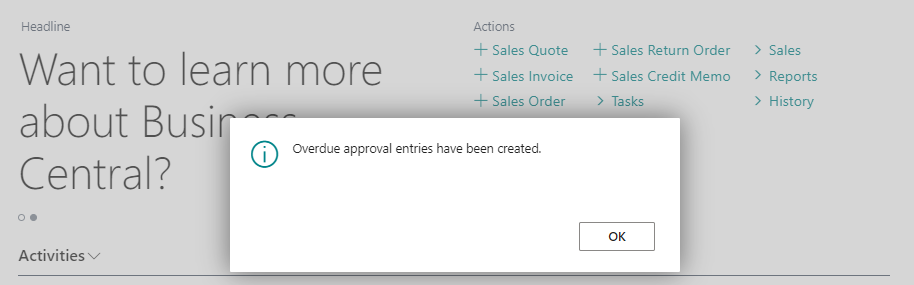
Check the ‘Overdue Approval Entries’ page. We can see that both overdue approvals have been created.

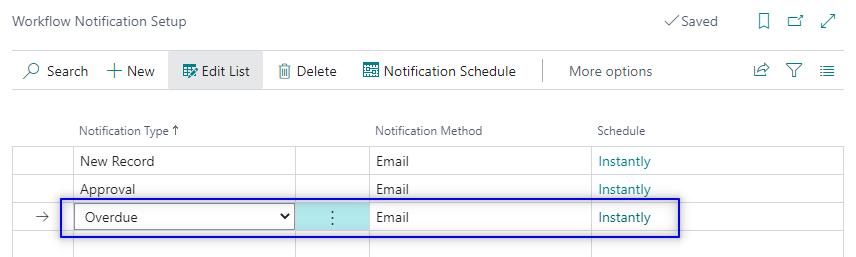
You can choose the notification method in the ‘Workflow Notification Setup’ page:
Posted Approval Entries
When you post a document that has been approved the approval entries will move from ‘Approval Entries’ to the ‘Posted Approval Entries’ page.

That´s all the basics you need to know about approval workflows. Note that approvals can have a lot more possibilities like chain approvals, specific approvers, etc.
Hope you find it useful.
hello, Business Central Geek
I have a question about Sales Order Credit Limit Approval Workflow.
I created a new workflow from the template. No changes made to the workflow.
I activate the workflow then I go to release a sales order with amount does not put them over the credit limit, but it ask me for approval.
How can I solve this? for me the template is wrong.
I think it cold be have another filter on that workflow, or probably is necessary a new step or response.
Thank you so much for your help.
Best regards,
Santiago
Hi Santiago,
I’ve never used this type of workflow. I’m not sure what should be the right way of the response.
Feel free to send me an email and we can see if I can help you out with this.
Hello,
I have a custom approval workflow which i created from scratch. I have noticed that anytime i delegate approval or use workflow user group that once my document is approved, the status of the document does not change to Approved. But when i use direct approver, it works perfectly. what could be the issue?
Hi, I’d try to use standard templates as much as possible. Or trying to copy them as much as possible.
There might be some steps missing in your custom workflow.
E-mail me if you want and we can have a look in detail.
I’ve created a Workflow that sends a notification, approval request and blocks record when a specific field is changed. But the field will be changed anyways and still can be changed after the request was sent.
Is it possible that the change only occurs after the approval?
e.g. User wants to change prefered bank account from 0001 to 0002 – User changes it, now it says 0002 and approval request is sent – i want it to stay 0001 until request is approved. In case of rejection it should stay 0001.
Is this possible via workflows or do i need an extension?
BR
Ivo
Hi! I don’t think that’s possible from the standard code perspective. An extension would be needed. Let me know if I can further help with it.
Hi All,
I have created a workflow in test environment, but the approver does not get a notification. I think it’s test database and standalone that’s why the approval doesn’t get the notification. What should I be doing in that case?I think I need to create one more email id to login and try how the process is flowing.
Please pour in your valuable inputs.
Hi all, I am looking to set up a customer approval workflow and looking for some guidance as to how to achieve the objective.
Objective is the following flow:
1. Customer card is created by a sales user who must submit to workflow with certain fields populated.
2. This goes to the sales director to approve.
3. Once the sales director has approved it should go on to notify finance user that there is a new customer that needs the finance fields such as payment method completing. The customer should be restricted
4. Finance user completes the finance fields on the customer card and submits to workflow for approval, this goes to the finance director
5. The finance director approves and the customer is unrestricted
Thank you for your consideration. Flick
Hi Felicity,
Send me an email at alberto.soben@businesscentralgeek.com and I can see how to help you with that!
Did you get this to work…I want to do this EXACT thing!
Hi, I’m wondering if there is any way to set up a PO Approval Workflow with 2 approvals; firstly, to go to First Direct Approval and then after to go to a Workflow Group? I have seen this done before however cannot recall if there was some development involved.
Any help is greatly appreciated.
Thanks!
I think it can be done, send me an email at alberto.soben@businesscentralgeek.com and I’ll see what I can do
Hi all,
At the end there is mentioned ‘When you post a document that has been approved the approval entries will move from ‘Approval Entries’ to the ‘Posted Approval Entries’ page.’
But what happens when you archive your order (receipt lines were fetched through an invoice so the order isn’t posted) and it is not visible anymore in your purchase order list? In the archive it doesn’t seem possible to view who has approved this order for audit purposes?
Thanks!
Hi!
Interesting question, I’m not sure at the moment. I would need to look at that particular scenario.
But I’m afraid if it’s not posted you will lose it.
Hi,
I’ve enabled my approval workflow, but how do I prevent a Purchase Order from going through approval process again if the PO amount is reduced? Any edits we make to the quantity or dollar amount has thrown the PO back into approval workflow, even if the amount is lower.
Hi,
That’s just how Business Central works.
If you modify quantities and amounts you have to approve the document again.
Otherwise it could be posted with something different than what it was approved in the first place.