One of the most popular tools in Microsoft Dynamics 365 Business Central is Configuration Packages (former Rapid Start). In this article, we will cover the basic and advanced features of this tool.
- WHAT IS A CONFIGURATION PACKAGE?
- HEADER ACTIONS
- Get Tables
- Export/Import Package
- Apply Package
- Validate Package
- Export/Import Excel
- HEADER FIELDS
- Product Version
- Language ID
- Processing Order
- Exclude Config. Tables
- LINE ACTIONS
- Package Data
- Database Data
- Errors
- Fields
- Filters
- Processing Rules
- Get Related Tables
- Validate Relations
- Apply Data
- Export/Import Excel
- LINE FIELDS
- Parent Table ID
- Data Template
- Dimensions as Columns
- Skip Table Triggers
- Delete Table Records Before Processing
- Delayed Insert
If you find this article useful you can sign up and download the .pdf here:
GET THE DEFINITIVE GUIDE TO CONFIGURATION PACKAGES IN PDF NOW
For the examples below we will be using the ‘PAYMENT TERMS’ configuration package.

1. WHAT IS A CONFIGURATION PACKAGE?
Configuration packages is the tool that Microsoft provides to import and export data in Business Central.
The usual process to follow in a configuration package is:
- Setup the tables to import
- Export the Excel file
- Fill the Excel with data
- Import the Excel file
- Solve errors and apply data
Now, let´s look into detail at configuration packages and their possibilities.
2. HEADER ACTIONS

Get Tables
This functionality works along with the ‘Configuration Worksheet’. First, we need to set up the configuration worksheet. Create an area and add the tables to import.

If you have setup tables on the worksheet they will appear when you click on ‘Get Tables’. In this case, we just added the payment terms table.

Export/Import Package
This option exports the whole package, tables included. Same for import package. This option does not import or export data. Just the configuration package itself, that is, the configuration of the tables, fields, processing rules, etc. The main purpose of this option is to use the configuration in other environments. For example, in test environments.

Export/Import Excel
The way we can export or import data to Business Central is with Microsoft Excel.
When we export, it will generate an Excel sheet per table. To illustrate it, we have exported two tables, payment terms, and payment method.

You can now add new payment terms or methods. The structure of this file must not be modified, otherwise the import process will fail.
TEST1 and TEST16 will be the payment terms to import.

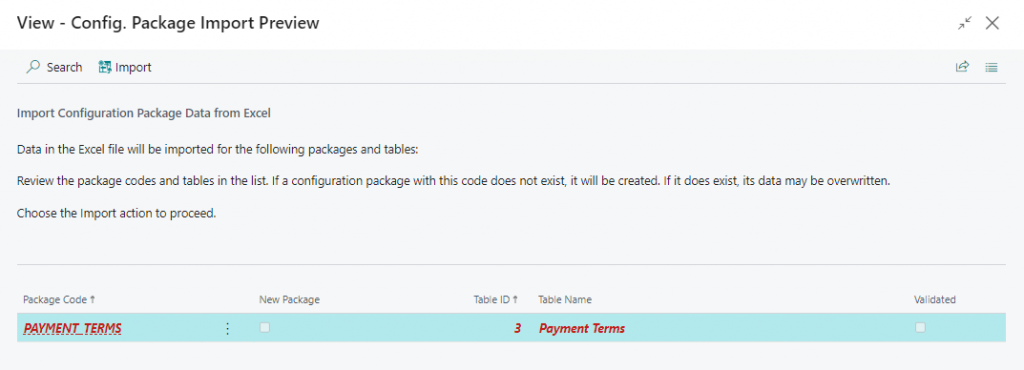
Once we have saved the file with the new values we can import it. A window like the following will appear. We just need to click ‘Import’.

Once imported, the data will stay at an intermediate table until the user decides to apply it to the database. In other words, this option will not import the data directly into the database. A second step is needed.
Validate Package
Now that the package data has been imported to the intermediate table we can run this validation.

It´s the same process as ‘Validate Relations’ from the line actions. We will illustrate it better in that section.
Apply Package
‘Apply Package’ is the final step when we want to import data into the system. Once we have inspected the package and fixed the errors we can run this option.


Finally, we can check the data imported. As we can see on the ‘Payment Terms’ page both TEST1 and TEST16 have been created.

3. HEADER FIELDS
Product Version
It is a free field to let users distinguish the version of the configuration package of Business Central. It can be useful when we work in migrating from different versions.

Language ID
This option defines the language of the package you are using. As the Business Central tooltip reads:
Specifies the ID of the Windows language to use for the configuration package.
Processing Order
We can define a number to help in the import processes. To let you know which packages to apply first.
Exclude Config. Tables
This option, if not checked, will export configuration tables when we export the package.

4. LINE ACTIONS
Table Section

Package Data
As we have mentioned above, once imported from Excel, the data will stay at an intermediate table until the user decides to import it into the database. This tabla is called ‘Package Data’ or ‘Config. Package Records’.

Database Data
This is the true data from the database. These are the records we will find in the table of Business Central.

Errors
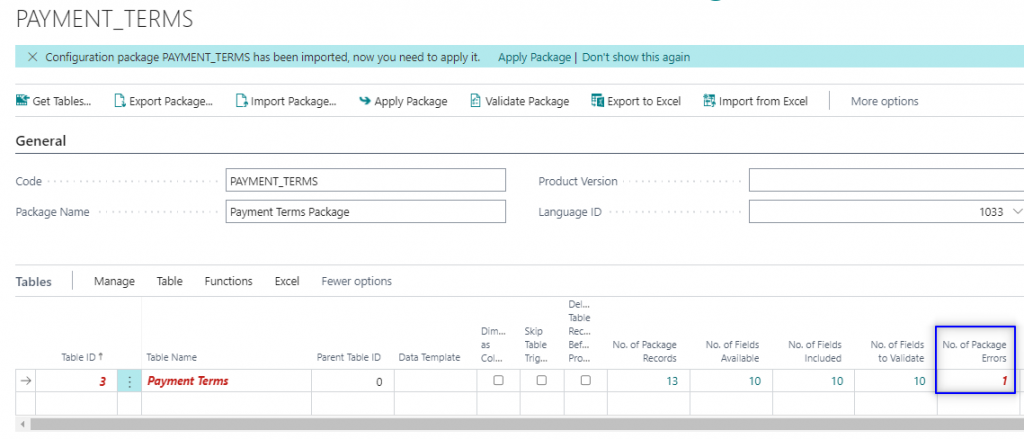
When filling the Excel file, users can introduce errors. For example, if we introduce a longer value than the limit of the field in Business Central an error will pop up:

The line will turn red and we can see the number of errors.

To see the error we have to click on ‘Show Error’ from the error list or just on the number of errors.


If we ignore the error and apply the package, the code will be cut to 10 characters automatically. In this case it´s the maximum length:

However, we can fix the error in the ‘Package Data’ before importing. You can do it like this and the error will disappear:
We can see the type and length of the field if we hover over the header in the Excel sheet:

Check Matthew´s post if you want to get a list of field types and limits instead of hovering over them:
Fields
Here we can choose which fields to include in the export/import process. Also, we can choose to validate the field or not. That is, trigger Business Central validations processes when entering data as we will normally do.

Filters
The filter option allows to setup some rules when exporting data.
Let´s test it out. We will set a rule for the ‘Due Date Calculation’.

We can tell if we have a filtered table thanks to the ‘Filtered’ field:

If we export the data we can see that only ‘COD’ with 0D calculation has been exported.

Let´s test the import with two records. One with 3D and other with 0D:

We get both records in the intermediate table:

If we apply we can see that they have been imported. As we can see, the filter only applies when exporting data, not when importing.

Processing Rules
Depending on the table, we can apply some actions for the data we wish to import. For instance, we can ship or invoice sales orders when uploading them to Business Central.

For further detail follow these examples:
How to Post Transactions using Configuration Package in business central – Ammolh Saallvi Blog
Functions Section

Get Related Tables
It allows bringing to the table set all tables related to them.
In this example, field 27000 is related to the ‘SAT Payment Term’ table:

If we click on this option it automatically populates the related tables. In this example, table 27017 has automatically been included.

Validate Relations
As we have mentioned above. This option is the same as ‘Validate Package’ from the header´s actions.
With this option, we can check table relations. For example, if we introduce a value ‘TEST1’ on the ‘SAT Payment Term’ field, it will check that this value is in the table. Otherwise, it will throw an error.

After importing the data from Excel we can select this option before applying it to the database:

As we can see, an error is found.
The field SAT Payment Term of table Payment Terms contains a value (TEST1) that cannot be found in the related table (SAT Payment Term).

Apply Data
Same option as the header. But we can select which tables to apply.


Excel Section

Same option as the header. The only difference is that we can do it for one or more tables.
5. LINE FIELDS
Data Templates
We have the possibility to apply templates to the tables.

In this example ‘TEMPLATE 1’ has 27D as the default value for the ‘Due Date Calculation’.

If we import the Excel with no data in ‘TEST1’ payment term:

And applying the package, we can see that the default value ’27D’ has been applied from the template:

Parent Table ID
We can use this option when certain data depends on other as in the headers and lines of a document. First, we need header data to create the lines. For example, the order number is required to be created on the header to be carried after to the lines.
In other words, the headers must be processed first and then the lines.

You can find an example here:
Dimensions As Columns
This option lets us break down Dimensions from the record. For example, let´s check this column for table 36 (Sales Header).

Before checking ‘Dimensions as Columns’ the exported Excel only had until the ‘GB’ column:

However, after exporting with this option enabled we can see that 7 dimensions have been added.

They correspond with the dimensions of the system:

Skip Table Triggers
Specifies whether codeunit triggers related to tables should be skipped during the configuration process.
This field along with the ‘Validate Field’ let you bypass controls and validations that would trigger before the import.

Check one use case here:
RapidStart Customer and Contact relationship import fail – Microsoft Dynamics NAV Forum Community Forum
Delete Table Records Before Processing
Be careful with this option. As it reads, it will delete all the data in the table and import the data of the package.
Video test:
Delayed Insert
Specifies that a record will only be inserted after validation that it contains key and non-key fields. If you do not select the Delayed Insert check box, then empty lines may be imported, for records with errors in non-key fields.
GET THE DEFINITIVE GUIDE TO CONFIGURATION PACKAGES IN PDF NOW
That´s all. Hope you find it useful.

Hi, thanks for the detailed article.
Im testing using a config package to import PO header and Lines. The import file from the supplier only has the Vendor Item id but the lines need the Item No. populated or they are invalid. I was hoping the system validation would lookup the vendor item id and populate the item no (and description) but alas I dont think it extends to that. Do you know of a method to do this within the package?
Thanks, Adrian
Hi, thanks for the comment.
Why don’t you use the ‘Item Reference No.’? This should link to your internal reference.
What permission sets need to assigned to a user for them to access Configuration Packages functionality?
Hi! There should be a permission set called “Conf. Packages” or similar.
Thanks for this clear and detailed explanation.
I have some tables automatically created when installing an App, and I would like to remove them.
I’ve saved the same tables empty in a config package, and I import it with “delete tables before processing” checked.
But the tables are not deleted. It seems that the deletion doesn’t run when the table to import is empty.
Would you have a tip for that?
Thanks for the comment.
I’d have to try that scenario. It’s not a feature used frecuently
What I do for this scenario, is inserting 1 blank record with which I can live with. But didn’t find another “clean” process to delete a table
Hello, thank you very much for the detailed article. It was really helpful.
Thanks for your feedback!
This is great. Wondering if youi can export the Config Package with Field Help Text (ie: when you hover over the field in BC the additional information that supports this field). Would be great if these coiuld be included in the export.
I’m afraid that’s not possible.
When exporting numeric fields to excel they are treated as text is there an easy fix for this.
Is it possible to export the package via AL codeunit?
Honestly, I don’t know, I’ll have to look for it