
JSON is the preferred format for data exchange in APIs. It’s used for sending and receiving data between a client and a server in a structured, predictable format. In this article, you will learn how to create and read a JSON structure in Microsoft Dynamics 365 Business Central.
- What Is A JSON
- JSON Data Types
- How To Create A JSON
- How To Read A JSON
- JSON Buffer
- JSON Management Codeunit
What Is A JSON
JSON (JavaScript Object Notation) is a simple format for storing and exchanging data. It’s made up of two basic parts:
- Keys and Values: JSON is built on the idea of key-value pairs. A key is like a label or name, and the value is the information associated with that label. For example, in
{ "name": "Alice" },"name"is the key, and"Alice"is the value associated with that key. - Arrays and Objects: There are two main types of structures in JSON:
- Objects: These are collections of key-value pairs, surrounded by curly braces
{ }. For example,{ "name": "Alice", "age": 30 }is an object with two key-value pairs. - Arrays: These are ordered lists of values, surrounded by square brackets
[ ]. For example,[ "apple", "banana", "cherry" ]is an array containing three values.
- Objects: These are collections of key-value pairs, surrounded by curly braces
JSON Data Types
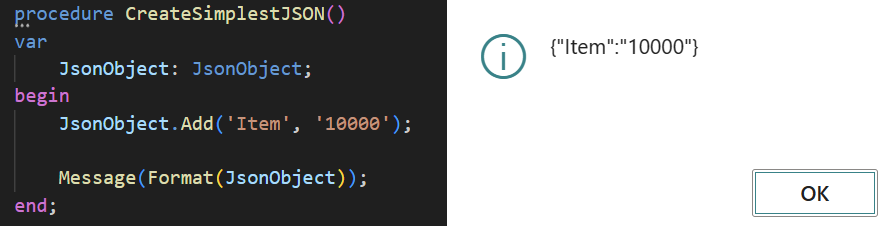
In Business Central, a JSON can be contained and handled by a specific data type called “JsonObject“. A JsonObject provides specific functions for creating and reading data from a JSON.
The simplest JSON can be created with “JsonObject.Add()” with the following result.
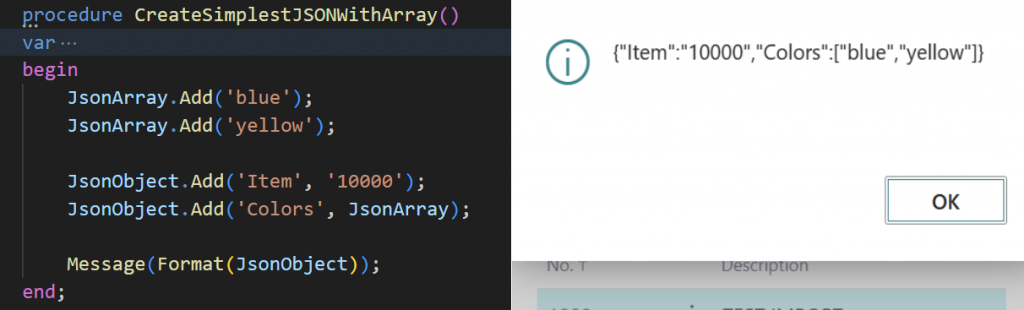
There are three more data types that help in JSON handling, they are JsonArray, JsonToken, and JsonValue.

An easy way to use a JsonArray can be the following. In this example, an item with two colors:
JsonToken and JsonValue are complementary types that help in JSON management. You will learn about them in the following examples.
How To Create A JSON
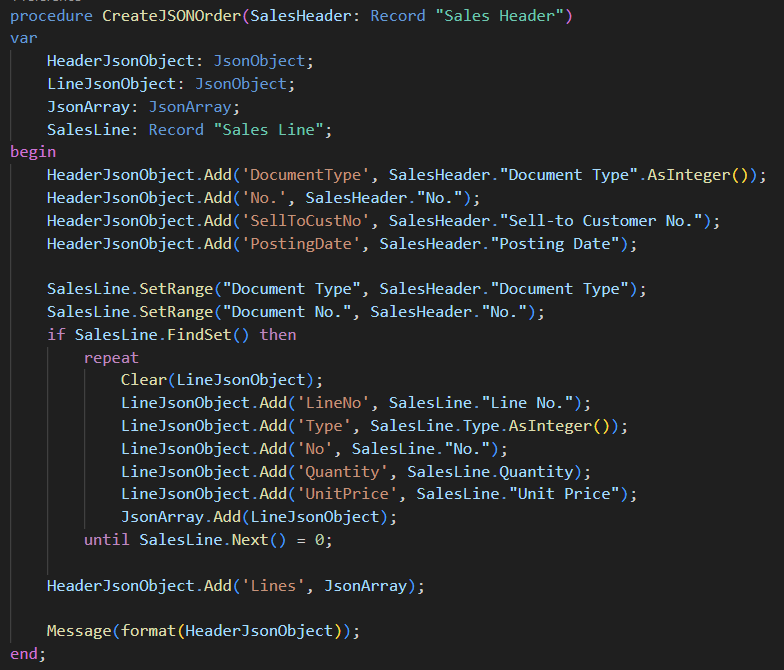
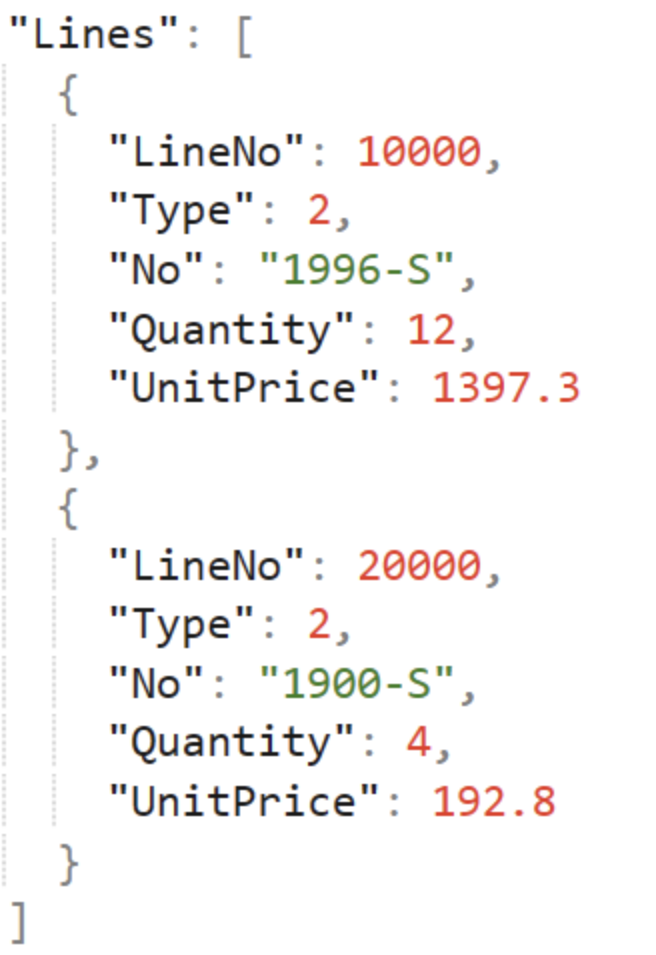
Now, let’s create a more complex JSON structure. For example, let’s create a JSON containing information from a Business Central order, with one header and two lines.
For this example, we will need two JSON objects, 1 for the header and 1 for the lines. The lines will be contained in a JsonArray.
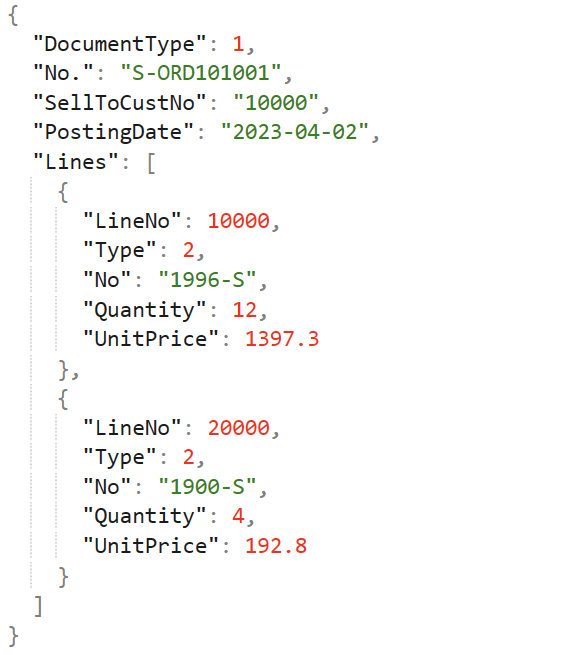
With the following result:
How To Read A JSON
Reading JSONs is as important as creating them. In this example, we are going to read the JSON from above. An order with header and lines.
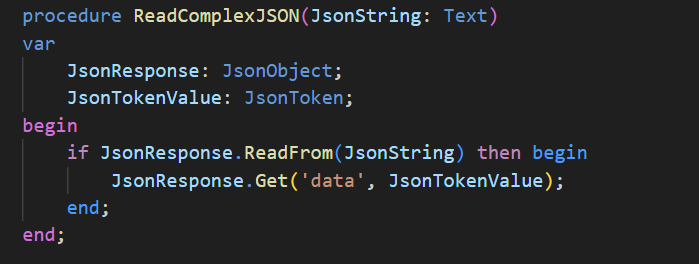
In a real-world scenario, JSONs are mostly used in APIs to exchange information. You’ll need to read a JSON from an API call. In this example, we received a nested JSON, with the information of the order inside “data”.
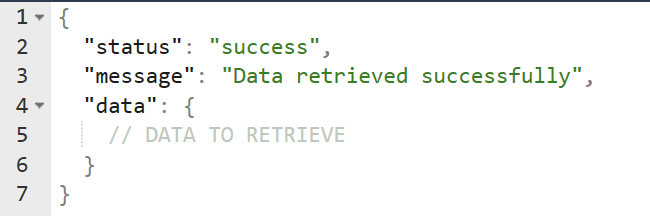
First, we have to retrieve the “data” from the JSON. We can do it by using Get(), and the result will be stored in a JsonToken.
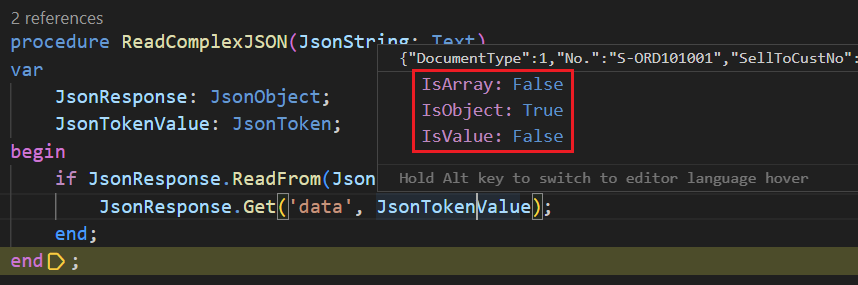
When debugged, you can see what the JsonToken contains. Along with some properties that help identify the Token. You can see that the JsonToken, in this case, is a JsonObject (IsObject: True).
A JsonToken can contain a JsonObject, a JsonArray, or a JsonValue.
The JsonToken contains the order, with the headers and lines. Now, let’s try to retrieve the ‘DocumentType’. But first, we have to transform the token into a JsonObject. For this, you can either:
- Assign the token to a JsonObject variable.
- Directly retrieving the Document Type by doing AsObject().Get().
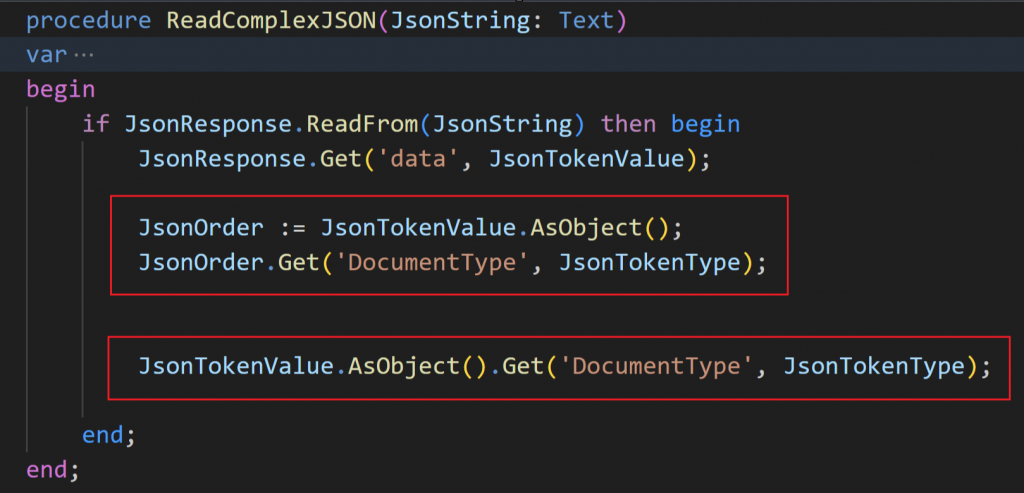
Finally, the information is stored in JsonTokenType, which we can extract with JsonTokenType.AsValue().AsInteger().

We can repeat this for all the information in the header.
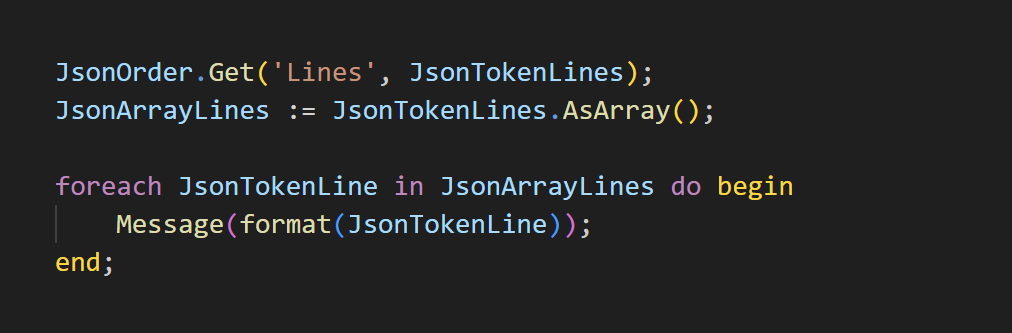
However, to retrieve the lines, we need to loop through them. Remember that the lines were in a JsonArray because they are stored between square brackets “[ ]”.
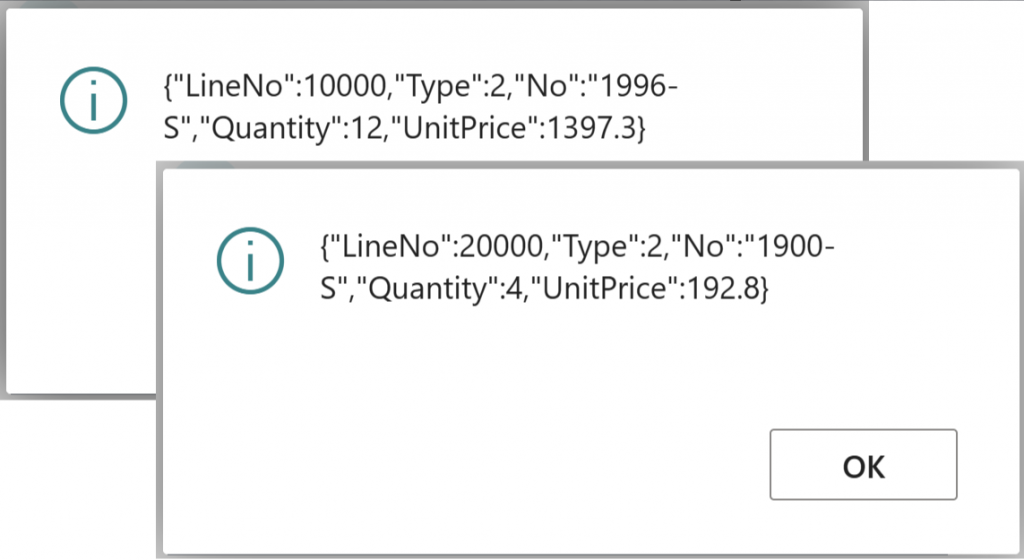
The loop can be as follows, with a ‘foreach’ to retrieve the tokens.
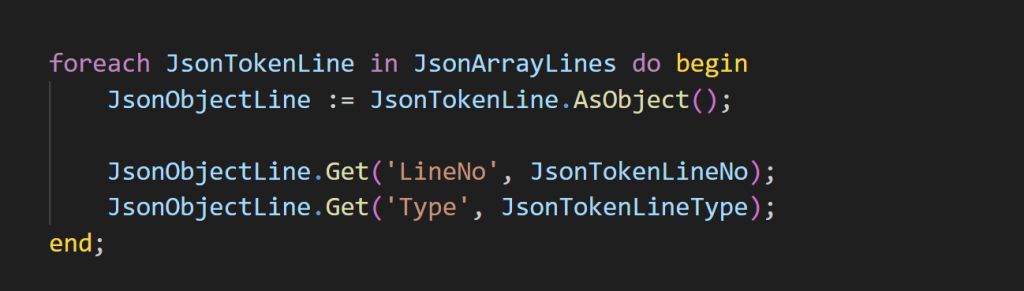
The result is the sales lines, where each of them is a JsonObject by itself.
Finally, we can extract the information as we did with the header.
Now that we have extracted all the information from the JSON, we can go ahead and create the sales order in Business Central or save the information somewhere else, whatever we need.
JSON Buffer
The JSON Buffer is an alternative to read JSON data, if we use it like this, where the page buffer is a custom page:
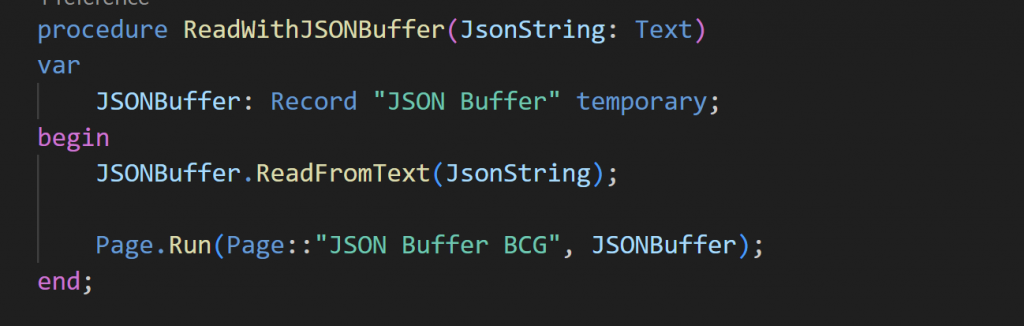
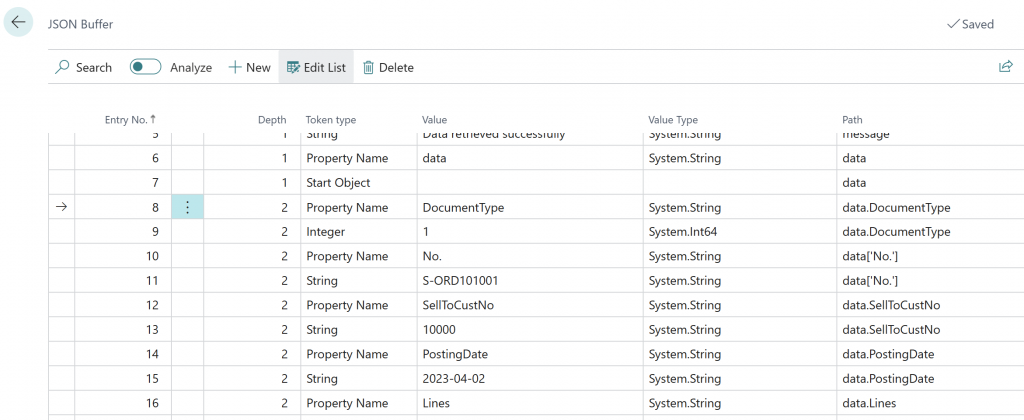
The result is a table with all the information of the JSON. In here, we can use “normal” logic like SetRange, FindSet, etc to retrieve data.
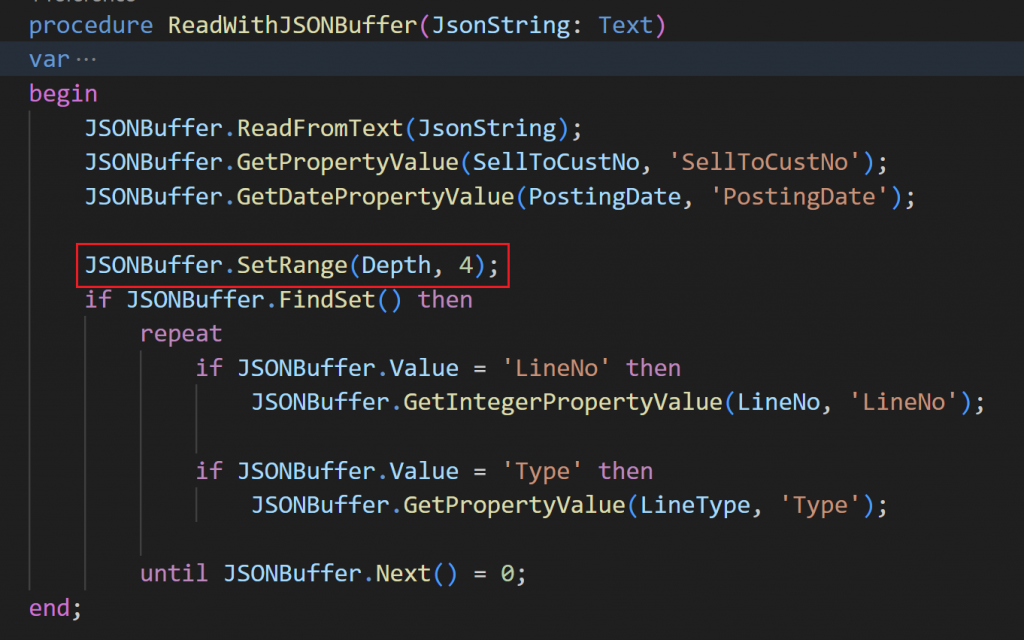
To get the information, you can use some built-in methods in the JSON Buffer table.
And for the lines we have to filter the ‘Depth’ of the JSON. And do something similar to this:
As mentioned above, JSONs are commonly used in APIs to exchange information. If you want to learn more about how to call APIs from Business Central, follow the article below.
JSON Management Codeunit
Alternatively, Business Central provides a JSON Management codeunit with procedures that help to read and create JSON structures.
You can find a detailed example of how to use it in the following article:
Dynamics 365 Business Central – Read a JSON File with AL – DvlprLife.com
That´s all. Hope you find it helpful.
Very useful blog.
Thanks.
Please keep posting on consume of webservice with example in BC i.e. sending data from BC and storing data inside BC.
I saw the declaration JsonString: Text
isn’t Text limited in length?
Only table fields need text length, variables don’t need it.
Very useful, I have a problem, I want to send the data as a nested json, to an API Page with fileName and fileContent, if I try to send a post with this body
{
“fileName”: “pippo.json”,
“fileContent”: {
“drink”: “soda”,
“lines”: [
{
“year”: 2020,
“brand”: “JEEP”,
“model”: “RENEGADE”,
“serie”: “120CV”,
“kmCost”: 0.4302,
“monthlyAmount”: 2550
},
{
“year”: 2020,
“brand”: “JEEP”,
“model”: “COMPASS”,
“serie”: “115CV”,
“kmCost”: 0.45,
“monthlyAmount”: 2650
}
]
}
}
I get this response:
{
“error”: {
“code”: “BadRequest”,
“message”: “Invalid Request Body CorrelationId: xxxxxx.”
}
}
there would have been awesome if i could have sent my file content to bc, in a blob field and the use your guide.
Do you have any suggestion on how to resolve my issue?
Thanks in advance
Hi Mattia, I’d have to look at your problem a little bit further.
Send me an email at alberto.soben@businesscentralgeek.com if you are interested.
What is JsonOrder Datatype ?
There is no datatype called JsonOrder..
What type does the variable “JsonOrder” have?
JsonObject. Sorry for the late reply..
Sadly JSON Buffer becomes unusably slow with medium JSONs. It scales poorly – so larger JSONs will probably be even slower. So probably best to not use it for more than a small one time json import.
Thanks for your feedback, great tip!
Useful content, I have a problem can anyone help? I’m doing POST integration and in the body there are several Json objects, one of which is “doc” which contains 8220 letters. Meanwhile, in Business Central, the text data type only holds 2048 letters. In this case, can the JS object be described so that it can be called for API purposes?
Thanks for your comment. If you like, send me an email at alberto.soben@businesscentralgeek.com and we can have a look together.
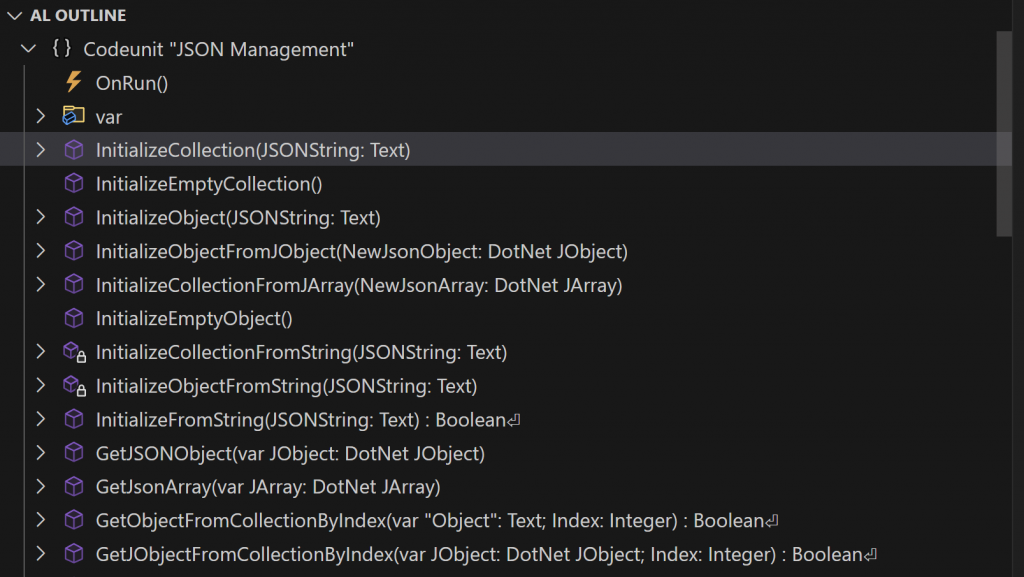
Hi. Thanks for this post, besides the on topic info i also found out about AL Outline feature and it’s all i ever needed.
Btw JSON Management Codeunit example link doesn’t present mentioned codeunit use.
Great, thanks for the tip!
I’ve just amend it, thanks!