
Sending emails is a basic functionality every company uses in Microsoft Dynamics 365 Business Central. In this article, you will learn 5 ways to send an email along with some improvements to open the sending possibilities. Also, you will learn how to check if emails were sent or not.
- Easiest Way To Send An Email
- How To Send An Email With Attachments
- How To Send An Email With Preview Window
- How To Improve The Sending Process
- How To Create An Html Body
- Bonus: How To Check Email Status
Easiest Way To Send An Email
The functionality of sending emails in Business Central is based on ‘Email’ and ‘Email Message’ codeunits. We will use the methods in these codeunits to create them.
We can use ‘EmailMessage.Create‘ and ‘Email.Send‘ to create a very simple email.

As you can see, we are using the new ‘Email Scenario‘ feature. Where we can define which emails send documents. The main purpose of this feature is to decouple email accounts from sending emails. You can find this feature on the ‘Email Scenario Assignment‘ page.
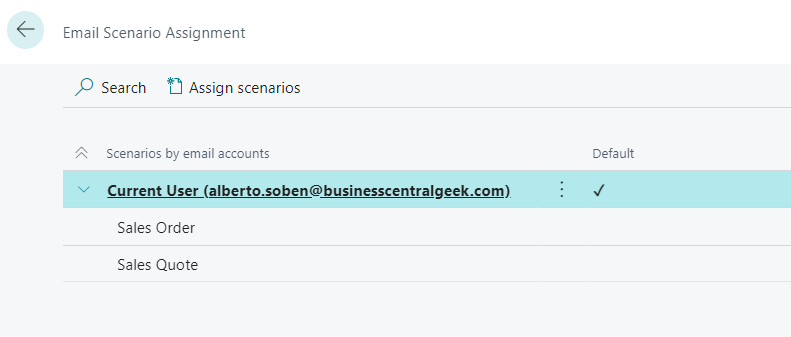
We have the possibility to extend the enum ‘Email Scenario’ with new options and add our own email scenarios. For this example, we will be using the ‘Default’ option.
How To Send An Email With Attachments
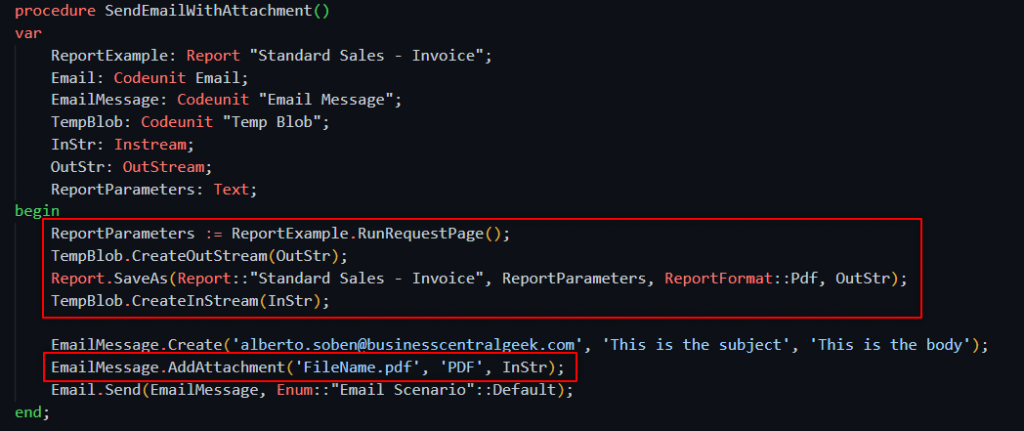
For sending attachments, we will use an InStream, an OutStream, and the ‘Temp Blob‘ codeunit. In this example, we will attach a sales invoice in ‘pdf’ format. First, we will ask for the invoice to attach. We achieve it by running the request page of the report and saving the filters applied in the ‘ReportParameters’ variable.
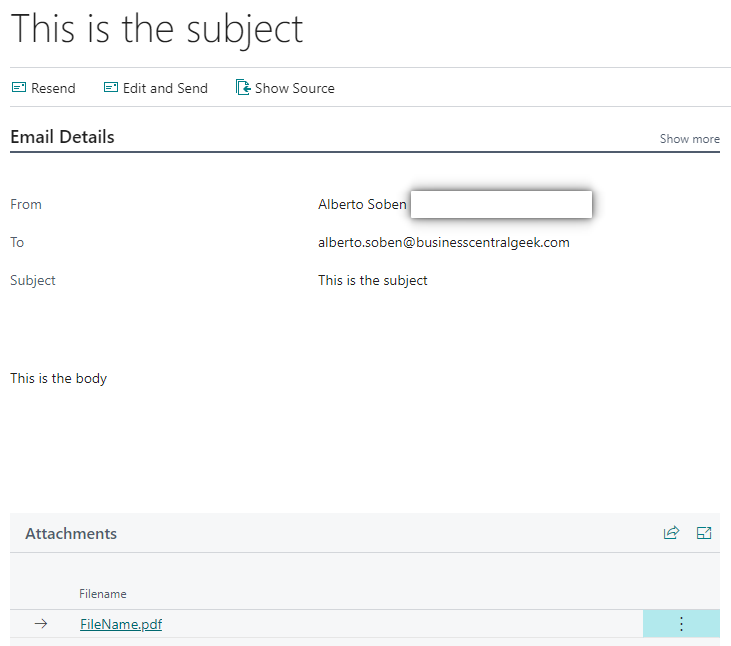
The email will look similar to the following:
If you want to learn more about InStreams and OutStreams follow the article below:
How To Send An Email With Preview Window
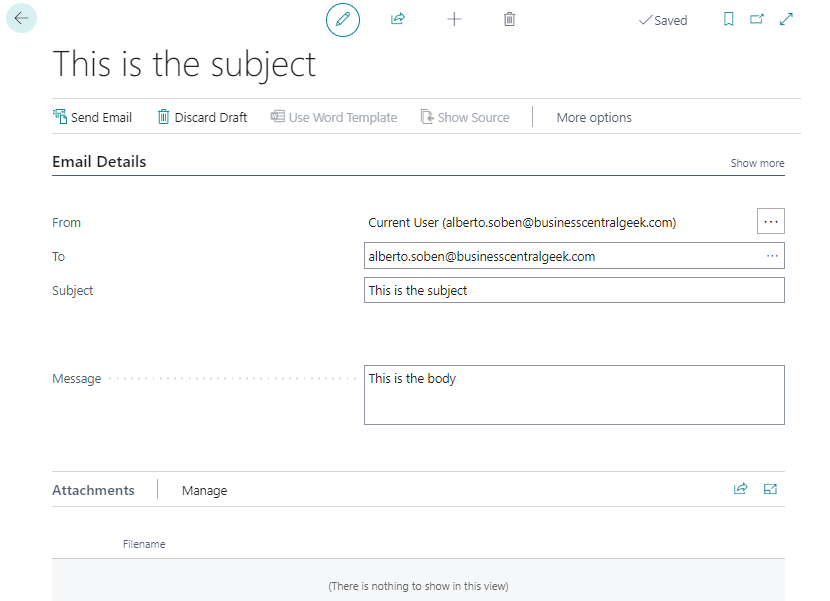
The preview window is the page where the user can see and modify the email before sending it. We can use the method ‘Email.OpenInEditor‘ for this purpose.

Before sending, we can modify or check the email. The page will look similar to this one. Here we can also attach any document:
How To Improve The Sending Process
Until now, we have been using some basic methods for our functions. Let´s see how we can enhance the sending process.
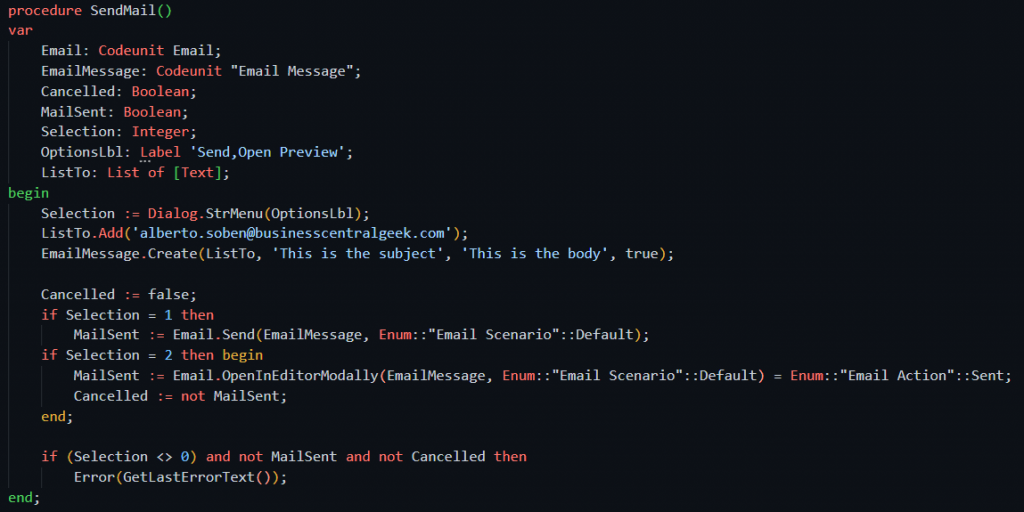
Here is a list of improvements we are going to make.
- Create a list of recipients
- Html format for the preview window
- Selection of both sending options
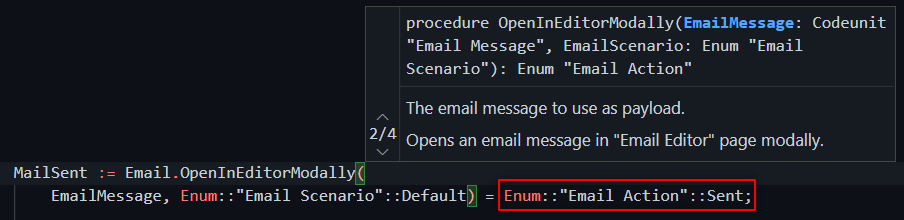
- Email.OpenInEditorModally
- Show Error if the email couldn´t be sent
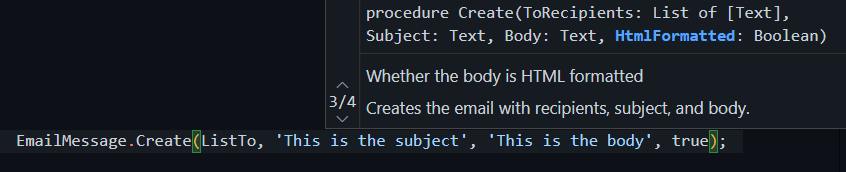
With the third overload of the function ‘EmailMessage.Create’, we can pass a list of recipients. Also, we can choose the Html format for the body.
We will use the ‘Email.OpenInEditorModally‘ to handle the response of the user. With ‘Email.OpenInEditor’ we couldn´t. An enum called ‘Email Action’ will tell if the user clicked on ‘Sent’.
We are going to use ‘Dialog.StrMenu‘ to let the user decide if they want to preview the email or not before sending it.
Then, we add to a list of every recipient we want for the email.
Finally, we can show an error if the message couldn´t be sent.
The final code will look like the following.
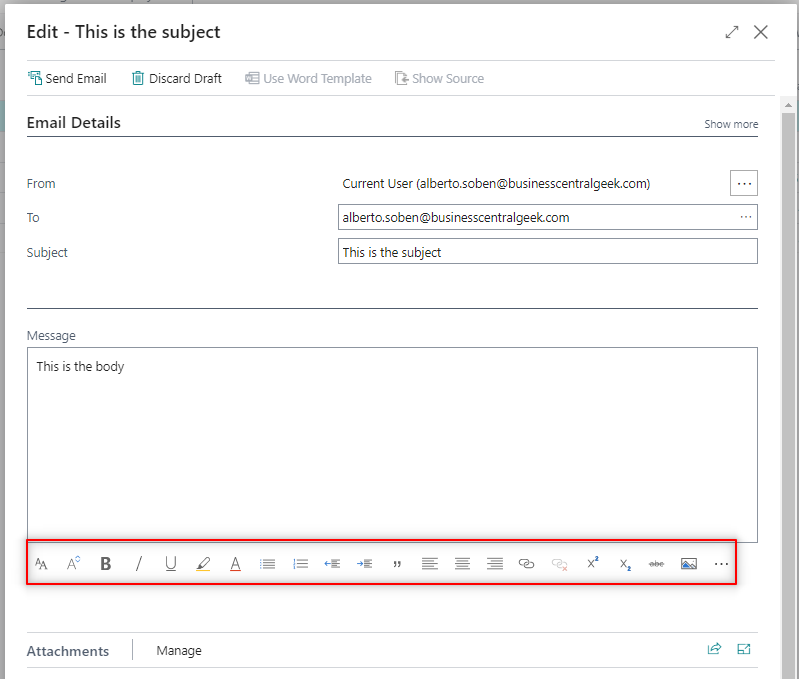
Because we chose Html format, we have access to the edit ribbon:
How To Create an Html Body
An email body can be simple as the one we have been using in the previous examples. However, if we want to improve our email appearance we can use an Html body.
We can even add our email signature with an image at the bottom. This is an example of how to do it:
This is the preview of the email just created:
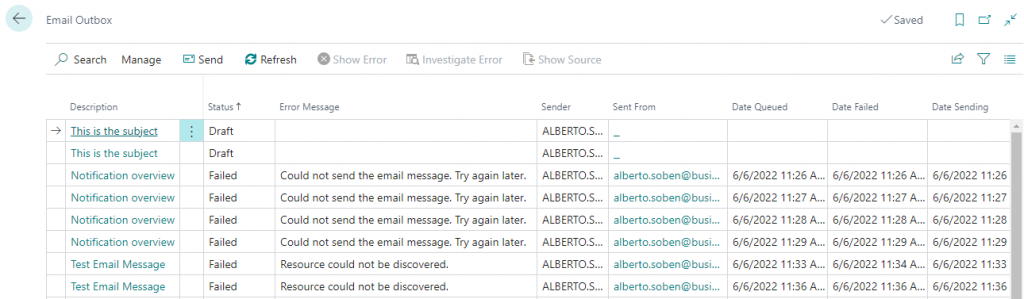
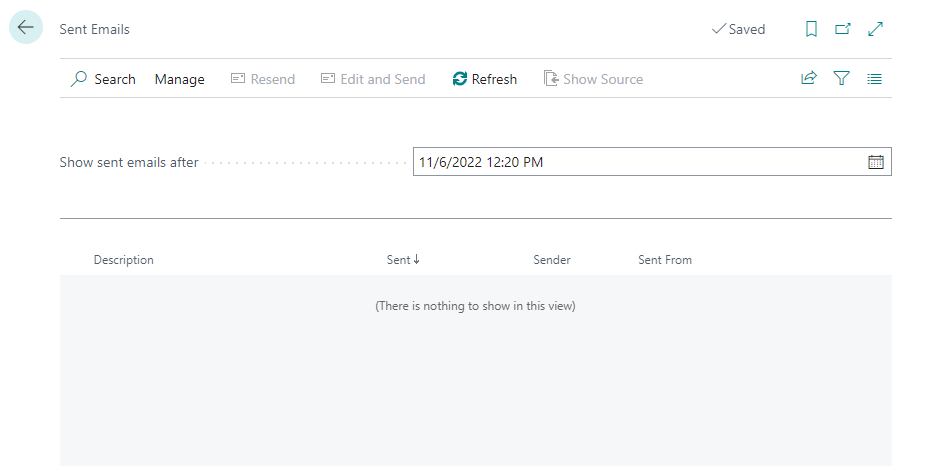
Bonus: How To Check Email Status
Business Central provides two pages to check if our emails were sent or failed, these are ‘Email Outbox‘ and ‘Sent Emails‘.
Email Outbox
Here you will find failed emails, drafts, pendings if they were queued, and mails in sending process:
Sent Emails
On the following page, we will see a list of emails sent successfully. We can see several information and also resend them if we want.
Source code:
procedure SendEasiestEMail()
var
Email: Codeunit Email;
EmailMessage: Codeunit "Email Message";
begin
EmailMessage.Create('', 'This is the subject', 'This is the body');
Email.Send(EmailMessage, Enum::"Email Scenario"::Default);
end;
procedure SendEmailWithAttachment()
var
ReportExample: Report "Standard Sales - Invoice";
Email: Codeunit Email;
EmailMessage: Codeunit "Email Message";
TempBlob: Codeunit "Temp Blob";
InStr: Instream;
OutStr: OutStream;
ReportParameters: Text;
begin
ReportParameters := ReportExample.RunRequestPage();
TempBlob.CreateOutStream(OutStr);
Report.SaveAs(Report::"Standard Sales - Invoice", ReportParameters, ReportFormat::Pdf, OutStr);
TempBlob.CreateInStream(InStr);
EmailMessage.Create('your email goes here', 'This is the subject', 'This is the body');
EmailMessage.AddAttachment('FileName.pdf', 'PDF', InStr);
Email.Send(EmailMessage, Enum::"Email Scenario"::Default);
end;
procedure SendEmailWithPreviewWindow()
var
Email: Codeunit Email;
EmailMessage: Codeunit "Email Message";
begin
EmailMessage.Create('your email goes here', 'This is the subject', 'This is the body');
Email.OpenInEditor(EmailMessage, Enum::"Email Scenario"::Default);
end;
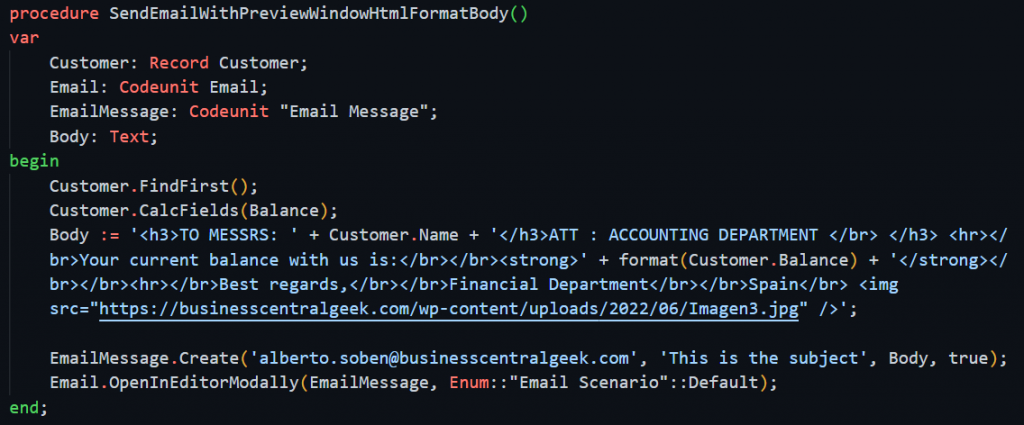
procedure SendEmailWithPreviewWindowHtmlFormatBody()
var
Customer: Record Customer;
Email: Codeunit Email;
EmailMessage: Codeunit "Email Message";
Body: Text;
begin
Customer.FindFirst();
Customer.CalcFields(Balance);
Body := '<h3>TO MESSRS: ' + Customer.Name + '</h3>ATT : ACCOUNTING DEPARTMENT </br> </h3> <hr></br>Your current balance with us is:</br></br><strong>' + format(Customer.Balance) + '</strong></br></br><hr></br>Best regards,</br></br>Financial Department</br></br>Spain</br> <img src="https://businesscentralgeek.com/wp-content/uploads/2022/06/Imagen3.jpg" />';
EmailMessage.Create('your email goes here', 'This is the subject', Body, true);
Email.OpenInEditorModally(EmailMessage, Enum::"Email Scenario"::Default);
end;
procedure SendEMail()
var
Email: Codeunit Email;
EmailMessage: Codeunit "Email Message";
Cancelled: Boolean;
MailSent: Boolean;
Selection: Integer;
OptionsLbl: Label 'Send,Open Preview';
ListTo: List of [Text];
begin
Selection := Dialog.StrMenu(OptionsLbl);
ListTo.Add('your email goes here');
EmailMessage.Create(ListTo, 'This is the subject', 'This is the body', true);
Cancelled := false;
if Selection = 1 then
MailSent := Email.Send(EmailMessage, Enum::"Email Scenario"::Default);
if Selection = 2 then begin
MailSent := Email.OpenInEditorModally(
EmailMessage, Enum::"Email Scenario"::Default) = Enum::"Email Action"::Sent;
Cancelled := not MailSent;
end;
if (Selection <> 0) and not MailSent and not Cancelled then
Error(GetLastErrorText());
end;
That´s all. Hope you find it helpful.
This guide is excellent. Thank you!
Thanks for your comment! Glad you liked it!
Thanks for this, it help me a lot. There is a way to activate the USE WORD TEMPLATE button?? it has a conditional that only enable it when the email has a record. Can you please help me?
Hi, glad it helped. Send me an email at alberto.soben@businesscentralgeek.com and we can find a way to help you!
Hi! I’m really interested to understand if it’s possible to use Word templates for body mail, by choosing from a list linked to the user. I’ve checked but it seems it’s not extensible…
thanks!
Wow. Everything at same place. Kudos to you.
Thanks, glad you liked it!
How can I copy other emails before sending like we have with SMTPMail.AddCC?
EmailMessage.AddRecipient(Enum::”Email Recipient Type”::Cc, ‘aa@aa.aa’);
Hi! Thank you for this! It helped me add a much needed functionality to one of our pages.
In my code I am able to email Transaction Details to a customer by attaching a PDF.
The only limitation is that it only attaches one pdf. My other scenario is what if this customer wants several records. This would mean that I would have to select each record separately.
Is there a way that I can specify the filters to be able to generate several records in one email?
Example: I have filters CustomerNo (Which would help pull up the email), and TransactionNo: for several transactions I can specify 1| 222| 451| 121 etc to retrieve these transactions for the customer.
Here is my current code which only pulls up 1 record.
report 50041 “Send Invoice via Email”
{
UsageCategory = Tasks;
ApplicationArea = All;
ProcessingOnly = true;
dataset
{
dataitem(TransactionHeader; “LSC Transaction Header”)
{
RequestFilterFields = “Store No.”, “POS Terminal No.”, “Transaction No.”;
column(Transaction_No_; “Transaction No.”) { }
column(Receipt_No_; “Receipt No.”) { }
column(Date; Date) { }
column(POS_Terminal_No_; “POS Terminal No.”) { }
column(Customer_No_; “Customer No.”) { }
column(Email; Email) { }
dataitem(CompanyInfo; “Company Information”) { }
trigger OnAfterGetRecord()
var
Email: Codeunit “Email”;
EmailMessage: Codeunit “Email Message”;
OutStr: OutStream;
TempBlob: Codeunit “Temp Blob”;
RecRef: RecordRef;
InStr: InStream;
Customer: Record Customer;
Body: Text;
Subject: Text;
begin
TransactionHeader.TestField(“Email”);
// Retrieve company information
CompanyInfo.GET;
// Compose email body
Body := ‘Dear Valued Customer’ + ‘, Thank you for shopping with us! Your Invoice has been attached for your convenience.Sincerely,’ + CompanyInfo.Name + ‘, ‘ + CompanyInfo.”Phone No.” + ” + CompanyInfo.”E-Mail”;
// Compose email subject
Subject := ‘Sales Invoice ‘ + TransactionHeader.”Store No.” + ‘ ‘ + TransactionHeader.”Receipt No.”;
EmailMessage.Create(TransactionHeader.”Email”, Subject, Body, true);
// Set filters
TransactionHeader.SETRANGE(“Store No.”, TransactionHeader.”Store No.”);
TransactionHeader.SETRANGE(“POS Terminal No.”, TransactionHeader.”POS Terminal No.”);
TransactionHeader.SETRANGE(“Transaction No.”, TransactionHeader.”Transaction No.”);
if TransactionHeader.FINDSET then begin
repeat
RecRef.GETTABLE(TransactionHeader);
TempBlob.CreateOutStream(OutStr);
Report.SaveAs(Report::”TV Detailed Receipt”, ”, ReportFormat::Pdf, OutStr, RecRef);
TempBlob.CreateInStream(InStr);
EmailMessage.AddAttachment(TransactionHeader.”Receipt No.” + ‘.pdf’, ”, InStr);
until TransactionHeader.NEXT = 0;
end;
Email.Send(EmailMessage);
end;
}
}
requestpage
{
SaveValues = true;
}
trigger OnPostReport()
begin
Message(‘Email sent successfully!’);
end;
}
Any help would be greatly appreciated.
Hi, if you like, send me an email at alberto.soben@businesscentralgeek.com and we can have a look together.
Thanks for sharing,
i have question for this article,
How to enable word template, i see on your tutorial
word template still disable.
Thanks for asking, I’ll have a look again and let you know.
I think it requires some more customization.
proper email format for the Remainder Module , to give a proper report in the Email about the due date with the details.
Hi! What do you mean exactly?
Thank you for the detailed guide on the various ways to send emails in Dynamics 365 Business Central. Your insights into sending emails with attachments, using a preview window, and creating HTML bodies are extremely valuable. As a company specializing in Dynamics 365 Business Central implementation, these techniques are highly relevant and will greatly enhance our email management capabilities. The practical examples and step-by-step instructions make it easy to follow and implement. We appreciate your expertise and look forward to applying these methods in our projects.
An excellent read that will keep readers – particularly me – coming back for more! Also, I’d genuinely appreciate if you check my website webemail24 about Car Flipping. Thank you and best of luck!
glad it could help!
hola me quedo una duda en la variable:
ErrInfo: ErrorInfo;
ErrorInfo –> este que tipo de variable es?
Has anyone been able to send email from an external domain that uses office 365?
OAuth 2 does not work.
Case
external sales has office 365 has their tenant
Business has office 365 and Business Central
they cannot authenticate their account in my business central
Thanks for sharing, it really helps
Got stuck in the email preview with HTML, almost created a page for that, saved me a lot of time, thank you 🙂